Add a handmade touch to your Christmas decorations this year with this bright Christmas tree!
Level: Medium
Click here for a PDF version of this project.
What you will need
- Printable Christmas Tree Templates (pages 4 to 6)
- Selection of Coloured Paper, A4 - we used Livano Light Card and Fabriano Tiziano Paper
- UHU Glue Stick
- Scissors or X-acto Knife
- Cutting Mat (if using X-acto Knife)
- Tape
- Tombow MONO Permanent Adhesive Runner
- Foam Sticky Dots (optional)
How to do it
-
Print the Christmas tree templates (pages 4 to 6), onto plain A4 paper.
Cut around the outlines provided (leaving a clear border around the edges), before placing on the corresponding coloured card and sticking down along the edges with tape to secure it. Use your scissors or X-acto knife to cut out all the elements on coloured card.
Tip: For ease-of-use, you can also use a Tombow MONO permanent adhesive runner to help stick the edges of the template to the coloured card. - Christmas Tree Base Construction:
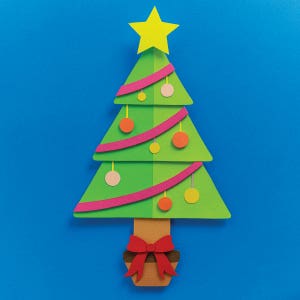
Glue Part B to Part A to make up the Christmas Tree Base (note that Parts A and B should be a different shade of green to create contrast as per the project photos). Glue Part C (tree stump) behind the tree base. - Christmas Tree Layers Construction:
Similar to the previous step, glue Part D to Part C, and Part B to Part A (with Parts B/D being a different shade of green from Parts A/C). Once completed, glue the layers together with the combined Parts C/D being on top of combined Parts A/B. These can then be glued to the Christmas Tree base in Step 2, before the star (Part E) is fixed to the top of the tree. - Baubles and Tree Ribbon Construction:
For each bauble (Parts A and C), there are corresponding ‘strings’ (Parts B and D). Glue one end of the ‘strings’ to the matching bauble, and then glue the other end underneath the Tree ribbon using the template guide and project photos provided for reference to location. - Christmas Pot Construction:
Glue Part A to Part B to create your pot base. For the ribbon, glue Part C on top of the middle of Part D, before sticking both to Part E. To finish off the Christmas pot, secure the ribbon to the top of the pot, making sure to centre it neatly. - Christmas Tree Assembly:
Gathering up your loose pieces, glue down the tree ribbon/baubles to the combined Christmas Tree Base/Layers first. Then, stick the Christmas pot at the bottom of the tree stump (Part C in Step 2)
IDEA: If you’d like to make your tree stand out and ‘pop’, use foam sticky dots to help raise details such as the star, baubles and tree ribbon, and pot ribbon!
Watch the Video
-
 UHU Glue SticksFrom $2.35
 -
 Smart-Cut Scissors$5.95
 -
 X-Press It Masking Tape RollsFrom $3.35
 -
 The Paper House Liviano Light Card Pack 10 A4
$7.60 $9.50
-
 Jasart Academy Cutting MatsFrom $11.95
 -
 Fabriano Tiziano Pastel Paper A4
$0.95 $1.25


