Level: Easy
Duration: 20 mins
How To Draw A Unicorn for Kids
First of all, how amazing and magical are unicorns! A favourite of many kids, there’s no wonder why you are looking for an easy way to help kids learn how to draw unicorns. Lucky for you, we have a super simple step-by-step guide for how to draw a unicorn made especially for kids. So collect your pencils and colouring-in materials and let's get started! (maybe even a little glitter on the side if you’re feeling extra magical!)
What you will need
- Pencil - Find Pencils
- Markers - Find Markers
- Eraser - Find Erasers
- A surface to draw on - Find Pads
- Feeling creative? Add some glitter!
How to draw a unicorn
- Begin with the Muzzle of the Unicorn
We’re going to begin with the head of the unicorn, in particular the muzzle. To do this, you just simply need to draw a ‘V’-like shape with a rounded bottom. The bottom part will be the mouth, so make sure it isn’t too boxy. - Draw in the back of the neck
Starting from the forehead area, curve upwards to build the head of the unicorn and then downwards. The downward stroke will be the neck, so it will need a slight wave to it rather than be super straight. - Add The Eye
A simple one, a complete circle with two smaller circles inside, which will make the eye glisten.
- Start the body of the Unicorn
Put your pencil in the middle of the right line of the muzzle, and draw downwards with a curve to the left to make the chest. From here, draw a straight line down to draw the front left leg. Finish this off in a rectangular shape - Continue by adding in the Belly
In this step, you just need to add a slightly curved line to the right, which will meet the back leg in the next step. - Draw in the back of the body and the back leg
Firstly, draw in the back, which will be roughly parallel to the belly. To begin the back leg, start by rounding off the back into the top part of the thigh from the back line. Next you add two lines from the body and the top of the thigh to begin the leg. This should be angled to the bottom right. Then finally, add in a rectangular leg.
- Fill in the other legs
We have done the left legs so far, so time to add in the right legs. The back right leg can be the same shape as the other back leg. The front can either be straight or bent. If it’s straight, it can either be the same as the other front leg, or you can angle it out for a stronger stance. Alternatively, to do a bent leg, you curve it around to get it that bent knee. Then to finish them off, give all the foot hoof lines. - Give the Unicorn a Tail
Unicorns have lovely big tails, so draw a nice and large tail at the back of the unicorn. A great way to do this is to draw multiple bunches of hair that will make it thick and lucious. - Add in a horn, hair and ears
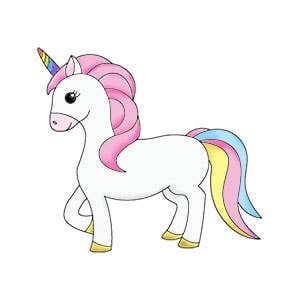
Now for the most identifiable part of the unicorn, the horn! Draw a horn on the forehead, with a diagonal line to give it the spiral look. At the bottom of the horn, add in a tuft of hair and an ear.
- Draw in a luscious mane
Finish it off with a glorious mane, starting from behind the ear and falling down over the left leg. - Add a few more details
Let’s draw a few more details, add a curved line across the bottom part of the muzzle. Add a small oval towards the front of the muzzle as the unicorn’s nose, and another curved line underneath as its mouth. - Give it some colours
Now for the fun part, colour it in! We personally like pink with our unicorns but feel free to go nuts and make them super colourful. And that's how to draw a unicorn step-by-step!

