Level: Easy
Duration: 15 mins
How To Draw Lips | Beginners Guide
Whenever you’re creating a portrait, one of the most important features is the lips. It’s a very interesting feature of a portrait as it reflects a huge part of expression and can help define how the portrait would look. Below is a simple step-by-step guide on how to draw simple realistic lips for beginners!
What you will need
- Pencil - Find Pencils
- Pastels - Find Pastels
- Erasers - Find Erasers
- A surface to draw on - Find Surfaces
How to draw a lips
- Start with the bottom lip
On your visual journal, (we prefer a non-ruled journal or Drawing paper, but any paper works) draw an oblong horizontally. You want to make sure that this is not too flat and long. This will be the base for the bottom lip. - Drawing the top lip
On each side of the oblong you just drew, draw two more oblongs that are slanted and parallel to each side of the bottom oblong. The tips of the oblongs should slightly meet in the middle. This will be the guide for your top lip. In between the 2 oblongs, draw a circle. It doesn’t need to be a perfect circle; it just needs to slightly overlap all the other oblongs. - Start with the mouth opening
Draw a line in between the shapes following the natural curves. This will mimic the opening of the mouth. Again, this does not have to be perfect as it will make it more realistic.
- Top Lip outline
Now that you have your middle line, you can go ahead and draw the outline for the top lip. Starting from the middle, draw a curved line that will represent the cupid’s bow. From there, connect each side of the line to each end of the middle line. - Bottom Lip outline
It’s starting to shape up! Draw a curved line underneath the first oblong. Connect the line to both sides of the top lip outline. You finally have a base for the lips! - Erase shapes and other guides
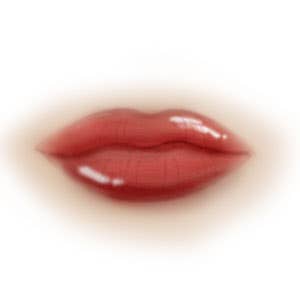
You can now erase the shapes and guides you drew earlier. This should reveal a nicely drawn lip. You can also slightly erase or blur the lip outline to make it less prominent for when you start colouring or shading.
- Let’s bring it to life
Whether you want to shade the lip using pencils or with colour using coloured pencils or pastels, it will be key to imagine a light as a guide to place your shadows. We recommend using different weights of pencils or monochromatic coloured pencils to make it more realistic. For this how to draw tutorial, we are using both pastels and coloured pencils. - Lets add some details
Now that you have the base of the lips, you can go ahead and add some lip lines. This will serve as the natural wrinkles on the lips. Don’t make them too dark as you would want them to blend in easily when you start shading the lips. - Want to make it more life-like? (optional)
Add a few more shadows using darker colours particularly at the bottom part of the bottom lips. In between the mouth, and a skin or darker coloured shadow at the bottom of the lips. An additional tip is to add a reflection, as if the lips had lip gloss on. It creates a subtle 3D effect on the drawing. We’ve also added a slight skin tone colour for more detail.
Related Articles:

