What you will need
- EDUCraft A4 Foam Sheets, 2 Packs
- Made For You 15g Glitter - Assorted Colours
- Made For You Printed 10W Glue Gun
- Elmer's School Glue
- Scissors
- Pencil
- Stencils (Downloaded from the internet
- Optional: Elastic or headband
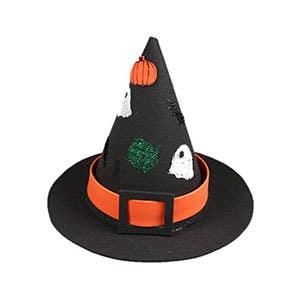
How to do it
-
Cut a large ½ moon shape from the black foam sheet.
-
Roll the shape from one corner to form a cone.
-
Once happy with your cone, use the glue gun to secure the loose end down. Set aside and allow to dry.
-
Using another sheet of black foam, draw a large circle and cut it out using scissors. This will form the base of your hat. TIP: Use the cone that you have just made as a guide for how big your circle should be.
-
Glue the bottom of the cone to the centre of the circle using the glue gun and allow to dry.
-
Cut a strip of orange foam to create the belt band (this should be big enough to fit around the entire circumference of the cone base. Thread the orange strip through a black foam square (you will need to cut slits at either end of the black square for this to work).
-
Secure the belt band onto the base of the cone around the hat using the glue gun. Allow to dry.
-
Embellish the hat with Ghastly Halloween shapes. We have used glitter and foam to create Glitter Bats, Glitter Ghosts, Glitter Cauldrons & Foam Pumpkins.
-
Optional: to secure, attach an elastic or headband to the underside of the hat.


