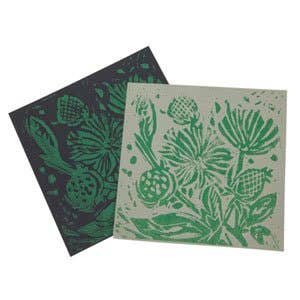
Create a beautiful floral lino print design, why not print multiple to create one large artwork
To download a PDF version of this lino print design project, click here.
What you will need
- Lino
- Lino Tools (assorted sizes)
- Safety Hand Guard
- Baren
- Block Printing Ink or Acrylic Paint
- Hard Rubber Roller or Brayer
- Printmaking Paper
- Paper (for testing print)
- Acrylic Sheet
- Block press (optional)
How to do it
- Cut out the required size of lino using a knife and ruler.
- With a pencil, draw out your design, on the lino, remembering that any exposed (uncarved) areas represent a reversal (mirror image) of the parts printed and the cut away areas will not be printed. (You may find it helpful to shade on the lino the areas you wish to carve to avoid any mistakes).
- Using the Lino tools start carving away the areas from your design you do not wish to be printed. The deep v groove blades are best for detailed areas and the u shapes are used when carving away larger surface areas.
- Prepare your paper before getting the ink ready. You can print on any type of paper, if use an archival printmaking paper it has a smooth absorbent surface that holds the ink well. Printmaking papers are also heavy weight so if you wanted to add colour with pencils, pastels, and watercolours etc. the paper can take it.
- Measure the size of your design and add at a good few centimetres to the height and width to give yourself a border on all sides. Use a knife if wanting a sharp edge or tear the paper to the correct size depending on the overall effect you want to create.
- You can print multi-colour linocuts by using separate plates for each colour, or by using a gradated ink roll. Use a piece of glass or acrylic on which to roll out your ink. If your lino is quite large squirt a few strips of paint across the acrylic sheet to help with even distribution of paint.
- Use your brayer (roller) to roll out the ink into an evenly coated rectangle. You don’t need to apply pressure when doing this. Keep rolling it out until you get an orange-peel effect in the surface of the ink. If you have too much ink on your palette, you’ll get smears when you’re rolling and you’ll see blobs of ink on the brayer which will result in uneven transfer to your paper.
- Once the brayer is evenly coated with ink you can roll it onto the lino. You will need to roll the brayer across the lino a number of times to get it fully covered. You can always do a test print on newsprint or another inexpensive paper first to ensure you are happy with the design and the ink coverage.
- A really hard brayer will roll the ink right on top of the surface of the plate. A softer brayer will deposit ink into soft of the carved out areas as it is run across the lino.
- You can use an L-shaped piece of mat board to align your paper correctly. Once the paper is in place on top of the linoleum, carefully burnish it up to all the edges of the plate with a printing press, baren, or a clean roller.
- Carefully peel back the paper from the plate. If you decide your design needs more carving clean off the ink with warm water, let it dry and then re-carve into the areas before re inking the design.
- You don’t need to clean the plate off in between prints. Lay out the prints to dry on clean newsprint, being careful not to let them overlap.
For more lino printing ideas and inspiration see our category and related products here.
NOTE: You can use either water-based or oil-based inks. The advantage to water-based inks is that they clean up easily without the use of solvents, but they do tend to dry faster. Oil based inks tend to give better coverage and won’t dissolve if I decide to using other paint mediums on the print afterwards but take days to dry properly. Baby oil is a safe, nontoxic way to clean up oil-based inks.
Featured Products
-
 Holbein Bamboo Baren 100mm$10.25
 -
 Safety Hand Guard$12.75
 -
 Velin BFK Rives Printmaking PapersFrom $15.95
 -
 Acrylic Cast PSFrom $17.95
 -
 Silk Cut Lino BlocksFrom $9.35


