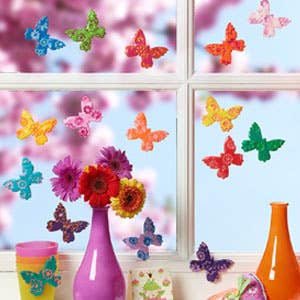
These pretty and colourful butterflies are quick and easy for children to create using a few simple techniques. They also encourage creativity and assists with their motor skills and make a wonderful present!
To download a PDF of this project, click here.
How to do it
- To make one butterfly, use your hands to roll out into a ball one block of FIMO kids modelling clay. Place the ball onto a sheet of baking paper and flatten slightly with your hand. Using the acrylic roller, roll out to approx. 2mm thick. Using the paint effects stamper gently press into the clay to transfer the pattern. You can also use the small shaped cutters pressing gently onto the surface of the clay, (you want to create an indentation of the shape on the clay not a cut out area).
- Using a butterfly shaped cookie cutter (not available online), press into the flattened out FIMO kids, pull away any excess clay before removing the cutter. Alternatively you can use the butterfly push mould to create your butterfly shape. This will give a more three-dimensional look.
- Transfer the butterflies in the oven for 30 mins at 110 C (you can leave on the baking paper), allow to cool and remove from the baking paper. Then cover the entire area in a thick coat of acrylic paint, it best to use a contrasting colour to the clay. While still wet wipe off the paint with a moist dish cloth. This removes the paint from only the elevated parts of the motif with any indentations on the clay retaining the paint in the grooves. Let the butterflies dry and then varnish them.
- You can now attach to windows, onto vases, mirrors, shelves or a plain picture frame. You could even attach ribbon or thread and create a mobile. Why not attach the butterflies to florist wire or wooden dowels to include into a plant pot or floral bouquet.
