Level: Hard
Click here for a PDF of this project.
What you will need
- Elmer’s Tacky Glue
- Educraft Felt Sheets
- Educraft Foam Sheets (Glitter and Brights)
- Reeves Coloured paper pad
- Card
- Scissors
- Ruler
- Pencil
- Craft knife
- Clear tape
- Compass
How to do it
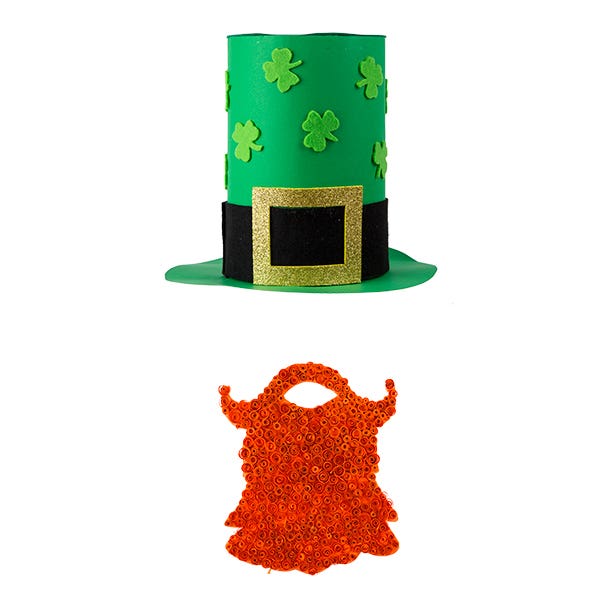
- For the St Patrick’s Day hat, first take some string or a measuring tape and measure the circumference of your head. Next, mark the measurement on a large sheet of green card and cut out the required length that has a height of 25cm. (The length should be the same as your head measurement – E.g. If you head circumference is 55cm, you will need a piece of card that is 55cm x 25cm). You can tape two pieces of card together if you do not have a sheet large enough. You should be left with a large cylinder shape.
- For the top part of the hat draw out a circle with a 18.2cm diameter and cut it out (this is based on a 55cm circumference measurement). Draw a smaller circle inside which is 17.5cm in diameter. Use scissors and make incisions from the outside edge of the cut-out circle to the drawn circle in the middle, continuing all the way around to create flaps. Bend these flaps inwards, then coat the inside cylinder rim with Elmer’s Tacky Glue and press the flaps onto the glued area to secure. Leave to dry
- For the hat rim, take a piece of green card and draw out a circle that has a 30cm diameter using a compass. Next, draw out two smaller circles on the same green card so you have a 5cm rim and 7cm rim. Cut out the smallest circle so you are left with a hole in the centre (like a donut shape). Use scissors and make incisions on this circle to create flaps, these will be used to secure the rim to the body of the hat. Then, bend the flaps upwards and coat the inside of the cylinder rim with Elmers Tacky Glue. Press each flap onto the glued area. Leave to dry.
- Take a long strip of black felt 10cm in width (Depending on the size of the hat, you may need to use two pieces of felt glued together) and secure to the base of the hat just above the green rim using Elmer’s Tacky Glue.
- For the buckle, cut out a 12cm square from the gold sheet of Educraft Glitter foam. Cut the centre part of the square leaving a 2cm border. Glue this on top of the black felt to create a buckle.
- Lastly, use the shamrock template to draw and cut out 15 shamrocks from the green Educraft felt. Stick them to the body of the hat with Elmer’s Tacky Glue ensuring they are evenly spaced out.
For the beard:
- Take an Educraft Foam sheet in orange. Draw and cut out a beard shape ensuring you also cut out a hole for your mouth.
- Next, take the orange sheets of paper from the Reeves Coloured paper pad and cut it into thin long strips with widths of 5mm and 10mm. You will need approximately five A3 sheets to cover an average size beard.
- Each strip now needs to be coiled tightly, you can either do this by hand or using a quilling tool, cocktail stick or thin knitting needle. Once you are happy with the coiled paper, glue it to the beard cut-out using Elmer’s Tacky Glue. Repeat the process until the entire beard cut-out is covered in coiled pieces of orange paper.
- Once the glue is dry, take some elastic cord and secure to either side of the beard so the beard can be worn. NOTE: Some of the coils prior to gluing to the beard will uncurl slightly. This is fine and will create a more three dimensional look to your beard.
Featured Products
-
 X-Press It Clear Tape RollsFrom $3.15


