
Level: Medium/Hard
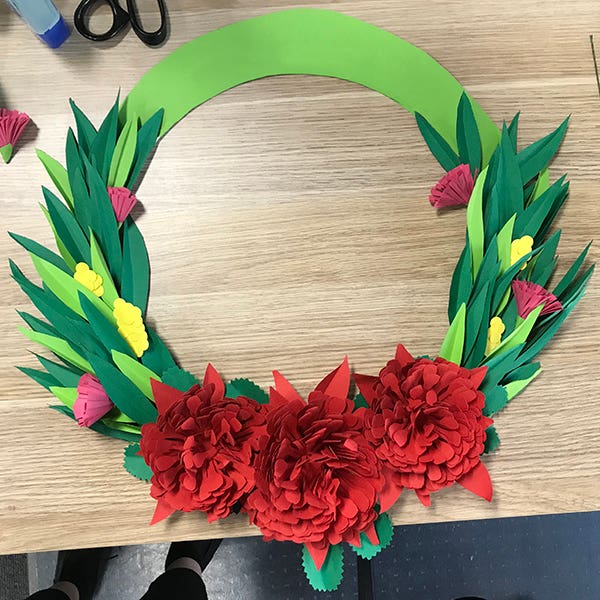
Bring a splash of pop colours and a touch of Australiana to your home or office this Christmas with your very own paper Australian native Christmas wreath.
Click here for a PDF version of this project and template.
What you will need
- Printable native flower templates
- Selection of The Paper House Liviano Light Card, A4 (We used Lemon, Fuschia, Green, Red, Grass, White)
- 1 x A2 Heavy Card (cut 40cm circle with 30cm hole in centre)
- Jasart Glue Gun and Sticks
- UHU Twist & Glue
- Scissors
- Royal Langnickel Emboss and Stylus Set (or other scoring tool)
How to do it
- Print native flower templates onto coloured light card. Follow cutting/folding guides on printed templates to cut your flower components out.
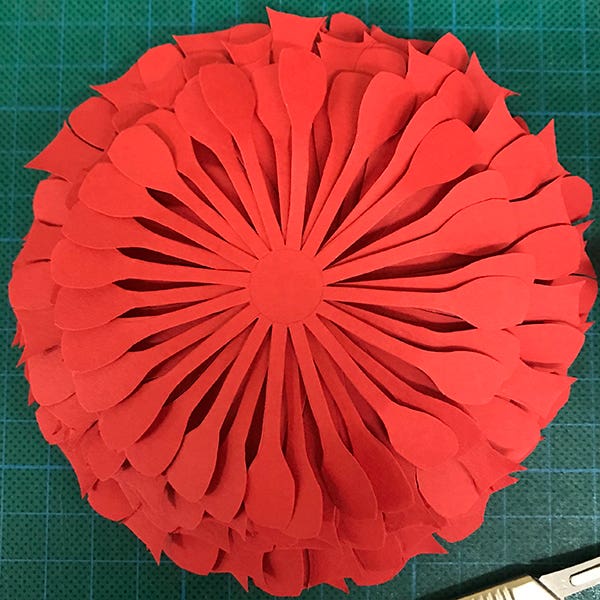
- Waratah Construction: Create your waratah base from the ‘bottom petal layers’ - stack the three layers on top of each other in your preferred order using UHU glue to secure. Curl two layers upwards and one layer downwards. Construct the rest of your waratah by stacking layers one through five on top of the base, using UHU glue on circle of each layer. Gently cup the constructed waratah in your hand to bend layers inwards and create your desired shape. Optional: cut jagged edge waratah leaves from dark green paper to add to bottom of flower.
- Flowering Gum Construction: Fold petal sections in half and then fold into a cone shape. Wrap the green base into a cone around the end of the petal section, secure with glue gun. Scrunch stamen piece into ball and stick inside flower with glue gun. Gently fan petal strips to create desired shape.
- Flannel Flower Construction: Use Royal Langnickel Emboss and Stylus to fold/score individual petals inwards for an organic shape. Use UHU glue to secure stamen piece to centre of flower.
- Gum Leaf Construction: Use Royal Langnickel Emboss and Stylus to fold/score individual leaves along centre for an organic shape. Group leaves into threes and glue together at bases to create small ‘branches’.
- Wattle Construction: Using scissors or a punch cutter, cut 10mm circles out of bright yellow paper to create wattle flowers. Group in overlapping clusters and glue gun together to create small ‘branches’.
- Wreath Assembly: Assemble your flowers and leaves around your heavy card circle in your desired arrangement (we started at the bottom with our waratahs and then worked our way around to the top). Be thoughtful with your arranging – overlap leaves and flowers to create depth. Secure pieces in place with glue gun.
- Finish: Use your wreath as a centrepiece for your Christmas festivities – lay flat on a table or attach twine/wire to back and hang from your door!
Don’t feel up to making an entire wreath? Create smaller arrangements to add a new dimension to your
gift-wrapping, cards or table arrangements. Your only limit is your imagination!

Featured Products
-
 UHU Twist & Glue$7.65
 -
 Jasart Glue GunsFrom $24.95
 -
 Jasart Glue Gun SticksFrom $8.95
 -
 The Paper House Liviano Light Card Pack 10 A4
$8.00 $10.00


